KitchenAid Vegetable Sheet Cutter Attachment: Reviews & Recipes
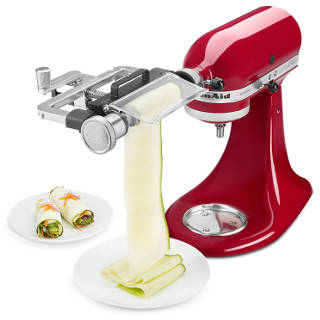
Would you like to have one of those trendy vegetable sheet makers that let you re-create healthier versions of your favorite recipes? If you already have a KitchenAid stand mixer at home, don't bother getting a stand-alone vegetable sheet cutter! You can turn your stand mixer into a fully-functional fruit and vegetable sheet maker by getting the KitchenAid Vegetable Sheet Cutter Attachment (KSMSCA) and attaching it to the power hub of your stand mixer. With the KSMSCA attached to your stand mixer, you will be able to turn zucchini, sweet potatoes, apples, cucumbers and other firm fruits and vegetables into thin or thick sheets in a matter of seconds.
Low in carbs and naturally gluten-free, these sheets can be used to replace high-carb ingredients in recipes for lasagna, pizza crust, enchiladas, chips, sandwich wraps, burritos, and more. And the best thing is, the KitchenAid Vegetable Cutter Attachment, which attaches to the power hub on your stand mixer, is compatible with all modern KitchenAid stand mixer models.
Below, we take a look at how the KitchenAid Vegetable Sheet Cutter Attachment works, plus provide a bunch of exciting recipes so you won't run out of ideas on how to use the KSMSCA Attachment in case you decide to buy it!
How to Use the KSMSCA
Note: Please carefully read the KSMSCA User Manual provided by KitchenAid before using the attachment.The following steps summarize how to use KitchenAid Vegetable Sheet Cutter Attachment to process harder fruits and vegetables such as sweet potatoes so you'll have an idea of how the attachment works. For more detailed instructions, and for instructions on how to process softer items such as zucchini, please refer to the User Manual.
- Insert the KSMSCA Vegetable Sheet Cutter Attachment into the power hub of your KitchenAid Stand Mixer, making sure it is completely secured.
- Prepare the vegetables or fruits as instructed in the recipe or the user manual. This may involve, for example, trimming off the ends and cutting the vegetables/fruits into more manageable shapes and sizes.
- Insert the food holder all the way into the center of the vegetable or fruit.
- Place the vegetable/fruit and food holder onto the main body, and twist clockwise to lock into place.
- Insert the food skewer into the skewer support on the attachment main body, making sure that it is centered on the food.
- Insert the thin or thick blade, depending on the recipe or personal preferences, into the blade carrier at a 45-degree angle. Turn on the Stand Mixer to Stir Speed.
- Pull toward the Stand Mixer and lift up on the blade release lever to unlock the blade carrier. Rotate the blade carrier slowly until it comes into contact with the food before letting go.
- Once you are done processing the food, turn off the Stand Mixer and rotate the lever clockwise to the locked position. Remove the blade.
Recipes for the KitchenAid Vegetable Sheet Cutter
Lasagna with Zucchini Sheets
Make a low-carb lasagna dish using your favorite lasagna recipe but use zucchini sheets in place of traditional lasagna noodles. To reduce the amount of water zucchini releases in the oven, you may want to get rid of some of that excess water before assembling your lasagna. This is how: Spread out the zucchini sheets on a baking sheet lined with paper towels and generously sprinkle with kosher salt. After 10 minutes, you should see some water beading on the surface. Pat the sheets dry with paper towels, then flip over and repeat the procedure.
Potato Crust Pizza
Use the KitchenAid Vegetable Sheet Cutter to turn a large zucchini into a thick sheet. Transfer the sheet to a cutting board and cut into 8-inch lengths. Brush sheets with olive oil and arrange in a circular pattern on a baking sheet lined with parchment paper. Bake in a preheated oven at 425°F for 20-25 minutes until golden. Remove the crust from the oven, and top with your favorite pizza toppings. Bake for another 10 minutes, until the cheese melts and begins to brown.
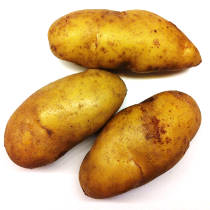
Spinach Quiche with Sweet Potato Crust
Spray a glass pie pan with cooking oil. Peel 1 large sweet potato and cut off the ends, then cut the sweet potato into 4-inch sections. With the Sheet Cutter attached to your KitchenAid, process the sweet potato pieces into long sheets (use the Thick Blade), then cut into 12-inch lengths. Brush the sheets with olive oil and arrange the sheets in the pie pan to form a crust. Press foil onto the sweet potato crust and bake in a preheated oven at 350°F. In the meantime, cook frozen spinach and chopped onion in a skillet until the spinach is completely thawed. Drain any excess water. When the crust has been in the oven for 15 minutes, remove the foil, and continue baking for another 10 minutes, then remove the crust from the oven. Spread the cooked spinach on the crust, and pour in a mixture of beaten eggs, parmesan cheese, milk and seasonings. Bake at 350°F for 30 to 35 minutes until a toothpick comes out clean.
Zucchini Rolls Filled with Avocado Mash
Use the KitchenAid Vegetable Sheet Cutter to turn a large zucchini into a thin sheet, then cut the sheet into 6 smaller sheets with a knife. Spread the sheets out on a work surface and top with an avocado mash seasoned with garlic, lime juice, smoked paprika, salt and pepper. Wrap tightly. Cut each roll into 4 pieces, securing with a pick, if needed. Serve immediately.
Zucchini Enchiladas
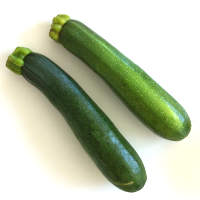
Yet another great way to use zucchini is to turn it into low-carb enchiladas! To do this, start by cutting two large, trimmed zucchini into 4-inch pieces. Next, use the KitchenAid Vegetable Sheet Cutter Attachment to turn the zucchini pieces into thin sheets, then cut the sheets into 6-inch pieces. Spread the pieces out on a cutting board and top with your favorite enchilada filling. Roll tightly and transfer to an oven-safe pan. Top with tomato salsa and cheese. Cover with foil and bake for 20 minutes in a preheated oven at 350°F, then remove the foil. Continue baking for 10 minutes more until beginning to brown.
Sweet Potato Chips
Cut two peeled and trimmed sweet potatoes into 4-inch sections. Attach the KitchenAid Vegetable Sheet Cutter Attachment to the power hub of your KitchenAid stand mixer. Use the Thin Blade of the Attachment to cut the sweet potatoes into thin sheets, then cut the sheets into chip-like pieces with a knife. Toss with olive oil and spread out evenly on a baking sheet. Sprinkle with sea salt and bake in a preheated oven at 375° until crisp, about 15-20 minutes, turning once halfway through. Let cool completely before serving.
Beetroot Chips
Cut two peeled and trimmed beets into 4-inch sections. Process the beets with the Vegetable Sheet Cutter Attachment to make long, thin sheets, then cut the sheets into 2-inch pieces. Toss with olive oil and spread out arrange the pieces on a baking sheet. Sprinkle with a little sea salt and bake in a preheated oven at 375°F until crisp, about 15-20 minutes, turning once halfway through the baking time. Let the chips cool before serving.
Zucchini Burritos with Scrambled Eggs
Attach the Vegetable Sheet Cutter Attachment to your KitchenAid stand mixer, and process a large zucchini into a thin sheet, then cut the sheet into 6 smaller sheets with a knife. Spread the sheets out on a cutting board and top with freshly-made scrambled eggs, cheese, chopped tomatoes and chunky salsa. Wrap tightly. Cut each roll into 4 pieces, securing with a pick, if needed. Serve immediately.
Buying the Vegetable Sheet Cutter on Amazon
One of the easiest ways to buy the KitchenAid Vegetable Sheet Cutter Attachment (KSMSCA) is to order it online, and have it shipped directly to your home. To view the current Amazon price for the KSMSCA and to check whether your purchase will be eligible for free shipping, click on the following link: