Growing Pea Shoots from Dried Snow Peas at Home (Indoors or Out)
Growing pea shoots indoors from dried peas is easy and rewarding. Snow pea shoots, which are completely edible and full of flavor, can be used to add texture and fresh flavor to salads and sandwiches. They can be grown in small pots or containers indoors at any time of year (including winter), and they need very little space. In milder areas they can also be grown outside in a sheltered, sunny spot.
Pea shoots are fast to germinate and grow, allowing you to harvest your crop in one to three weeks from sowing. And the best thing is, you can harvest pea shoots just before you add them to a salad or eat them in a sandwich (you can't get food fresher than that!). They are also healthy as they provide vitamins C and K as well as pro-vitamin A. Read on to find out how you can grow delicious and nutritious pea shoots at home.
Step 1: Soak dried peas
Before sowing dried peas, soak them in clean water. Soaking peas overnight will make them germinate faster. Simply place the peas in a large glass bowl and add two to three times as much water. The water should be cool, around 60 degrees fahrenheit (15 degrees celcius). Note that dried peas will double their size when soaked overnight, so you won't need many peas for a good crop.
Step 2: Sow the peas
Fill a tray or another container with high quality, nutrient-dense potting soil. Distribute the dried peas over the soil, being careful to broadcast them evenly across the soil surface. Gently press the peas into the soil and sprinkle with soil.
Step 3: Pick a well-lit indoor (or outdoor) location
After sowing the dried snow peas, pick a location for your pea shoot "garden". If you're growing pea shoots in winter, a kitchen counter or window sill that is exposed to natural sunlight is usually a good option. The best temperature for growing pea shoots is around 70 degrees fahrenheit (or 20 degrees celsius), but they will also grow well in cooler or slightly warmer temperatures.
Step 4: Water your pea shoots frequently
In order for pea shoots to yield a good crop, it is important to water them properly. Avoid overwatering by testing the soil's moisture level below the surface before watering (using your finger). It should feel moist but not soggy. Soggy soil may cause the dried peas pressed into the soil to become moldy or kill the roots of the young plants.
It is a good idea to keep the soil moist using a spray bottle until the seedlings emerge. Once the pea shoots are already growing well, you can also use a kitchen sink spray nozzle or a small watering can with fine holes.
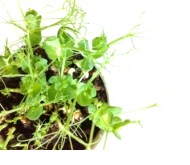
Step 5: Harvest pea shoots in one to three weeks
Pea shoots will be ready for harvest in one to three weeks when they are around six inches tall. They are typically harvested to include two to four pairs of leaves and immature tendrils. Harvest pea shoots by cutting the shoots with a pair of sharp kitchen scissors about 1/2 inch above the soil. It is best to cut shoots just before serving as they tend to wilt fast after harvesting.
Step 6: Use nutritious pea shoots in cooking
The sturdy snow pea shoots are a good source of many nutrients including vitamins C and K as well as pro-vitamin A. Thanks to the nutrition they provide, fresh pea shoots make a healthy addition to salads and sandwiches. They are also good lightly steamed or sauteed in Asian-style stir-fries.
Step 7: Plant a new crop
After harvesting, pea shoots can produce an other crop of shoots, but these shoots are usually small and tough. Therefore, it is best to discard the soil and the old peas, and to start a new crop by soaking a handful of new dried peas (see step 1 above).